Hướng dẫn căn chỉnh & định tâm bằng laser PhotoRobot
Hướng dẫn hỗ trợ người dùng này cung cấp hướng dẫn kỹ thuật về cách căn chỉnh và căn giữa các hệ thống laser chéo tích hợp sẵn của PhotoRobot. Làm theo các bước sau để tìm điểm giữa của bất kỳ tấm PhotoRobot tròn nào bằng cách sử dụng hai tia laser. Hướng dẫn bao gồm cách di chuyển vật lý tia laser đến giữa bàn, cài đặt laser ban đầu và cách tinh chỉnh vị trí laser. Ngoài ra, ở cuối sách hướng dẫn có hướng dẫn căn chỉnh và căn giữa hệ thống laser đặc biệt của bàn xoay C1300 (trước đây được phân phối dưới tên Case 1300).
Quan trọng: Trước tiên, hãy luôn tham khảo Thông tin & Hướng dẫn An toàn PhotoRobot ngoài hướng dẫn được cung cấp đặc biệt với thiết bị của bạn trước khi tự cài đặt hoặc bảo dưỡng.
Ghi: Tham khảo PhotoRobot First Use & Basic Testing để biết thông tin chi tiết về cấu hình mạng và các yêu cầu mạng.
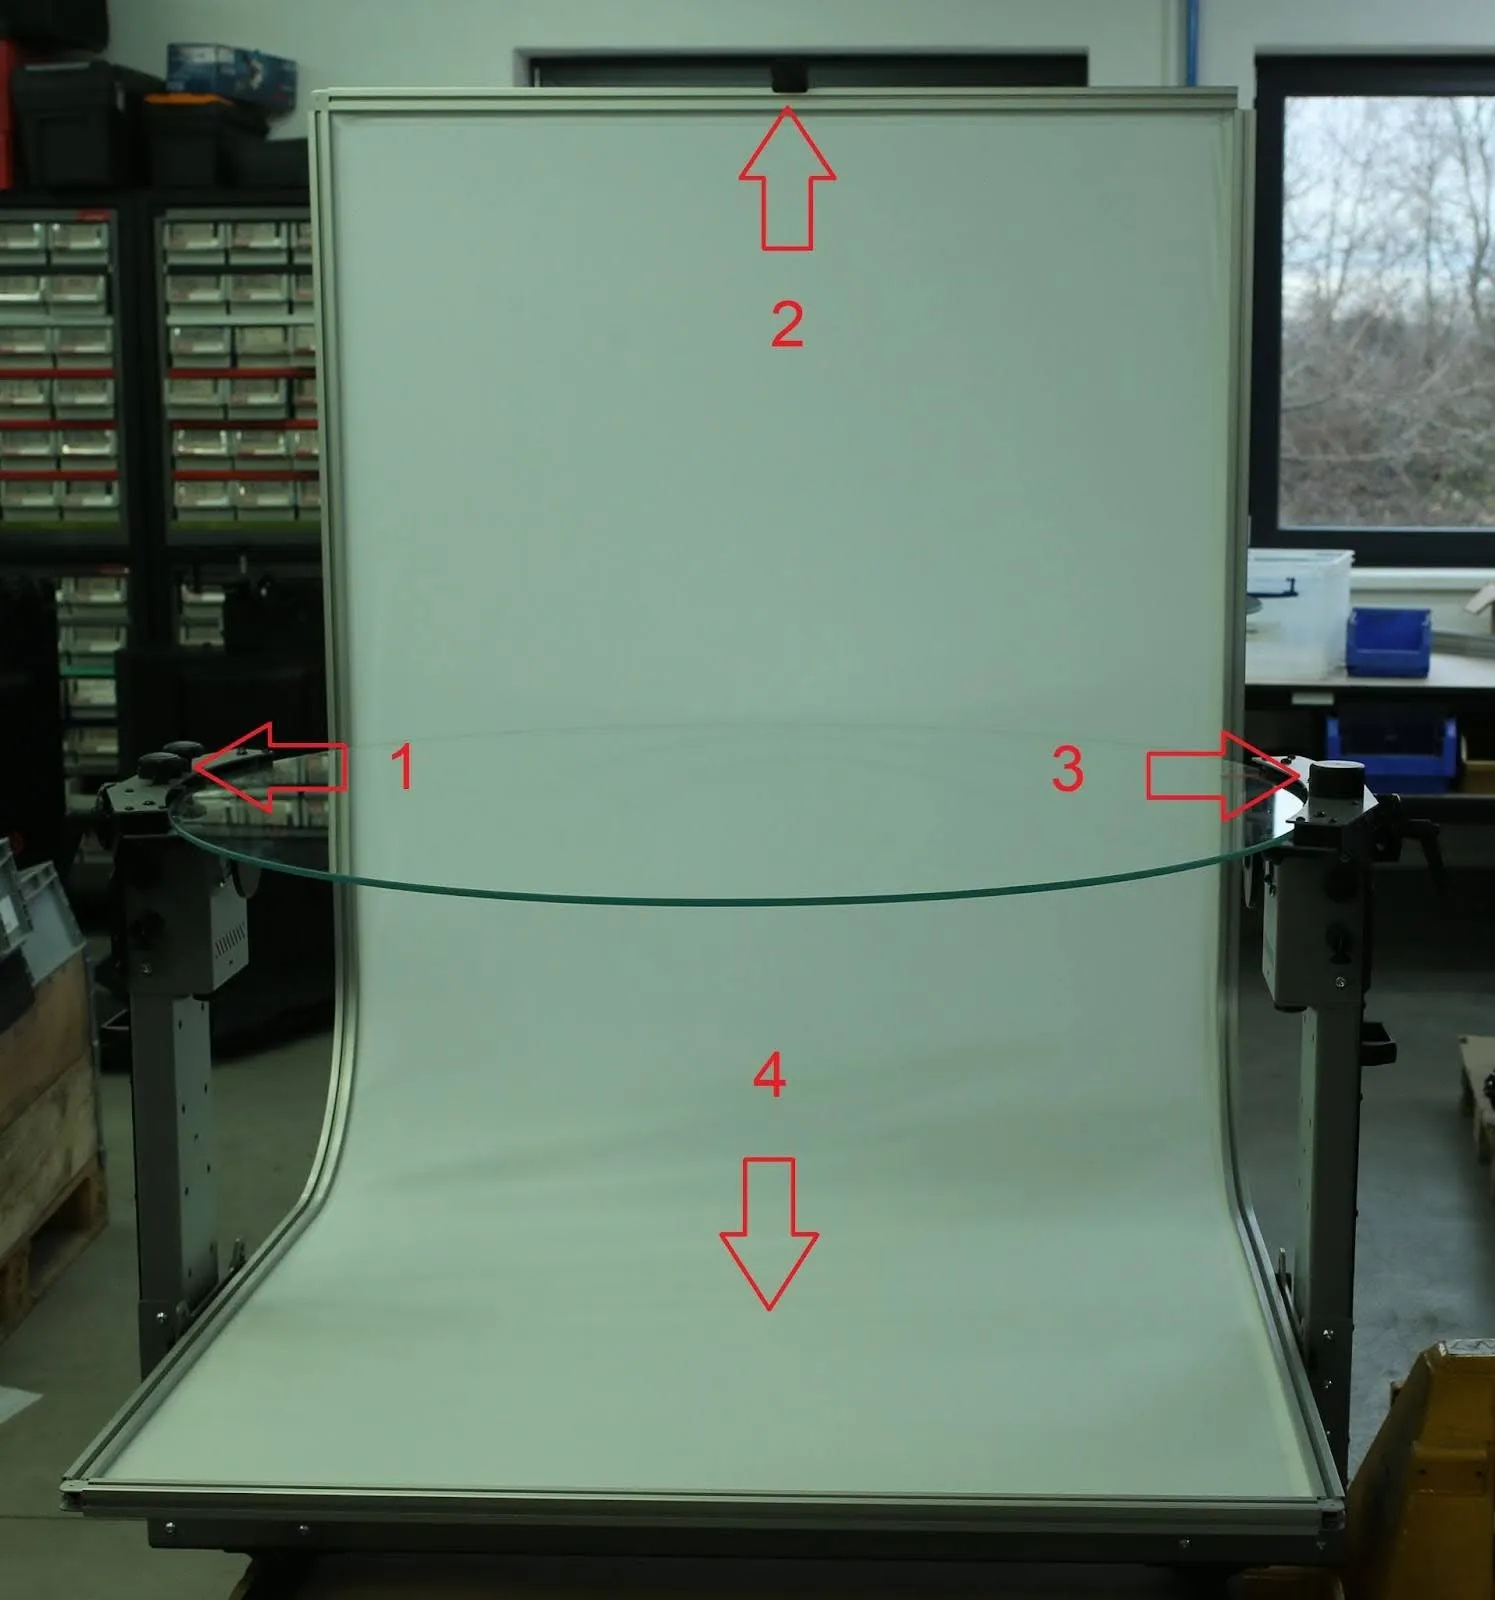
1. Di chuyển vật lý tia laser vào giữa bàn
1.1. Trước khi bắt đầu, hãy thiết lập kết nối giữa PhotoRobot và mạng cục bộ. Tiếp theo, bật nguồn Thiết bị điều khiển (Thế hệ thứ 6) và hộp laser.
Ghi: Để căn chỉnh và căn giữa hệ thống laser cho bàn xoay C1300, hãy tham khảo các hướng dẫn đặc biệt trong phần 4 của hướng dẫn sử dụng này.
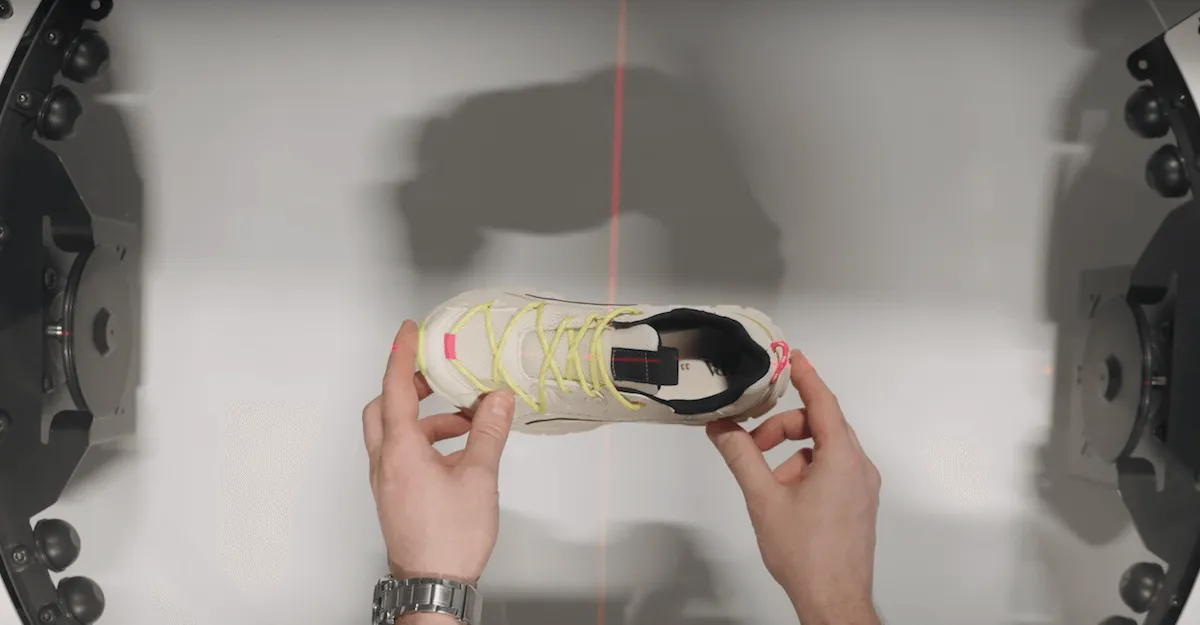
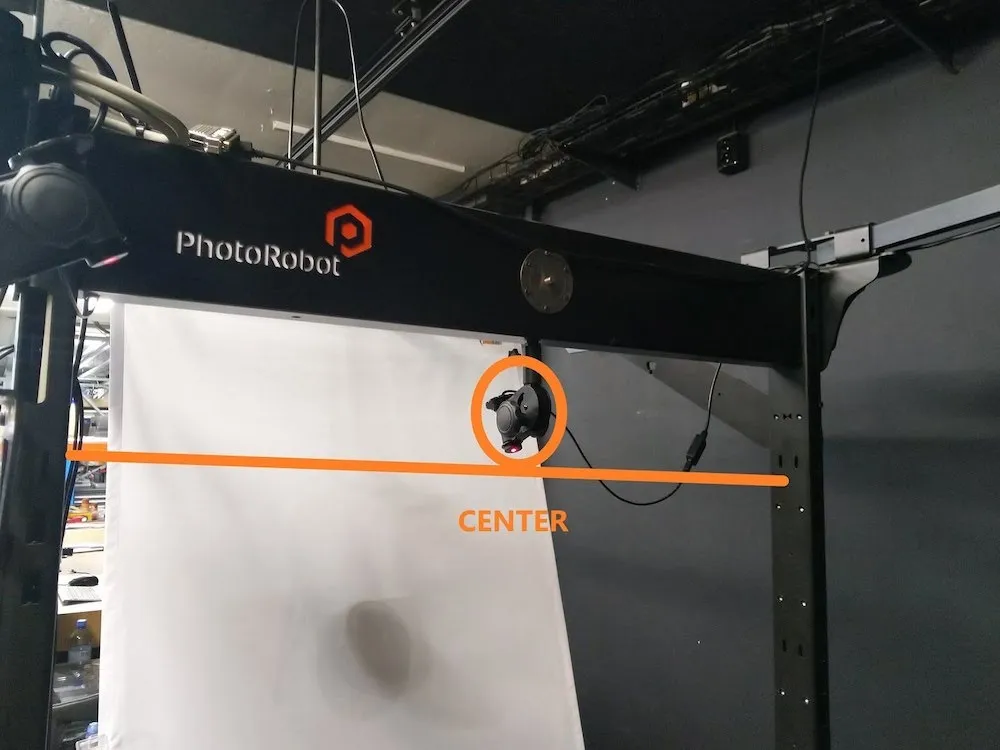
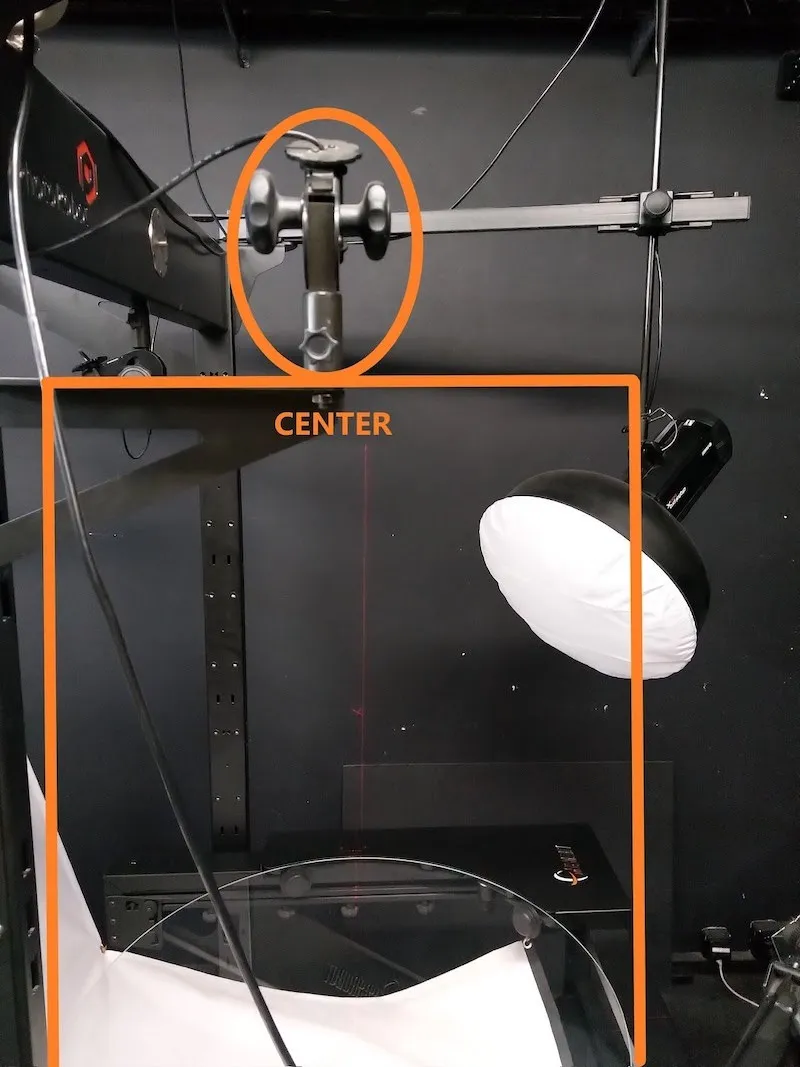
1.2. Sau khi kết nối PhotoRobot với mạng và bật nguồn Thiết bị điều khiển và hộp laser, hãy đo khoảng cách giữa cả hai mặt của bàn nơi gắn tia laser. Sau đó, xoay hoặc di chuyển tia laser bằng tay vào giữa và gắn chặt tia laser vào vị trí.
2. Ước tính cài đặt sơ bộ
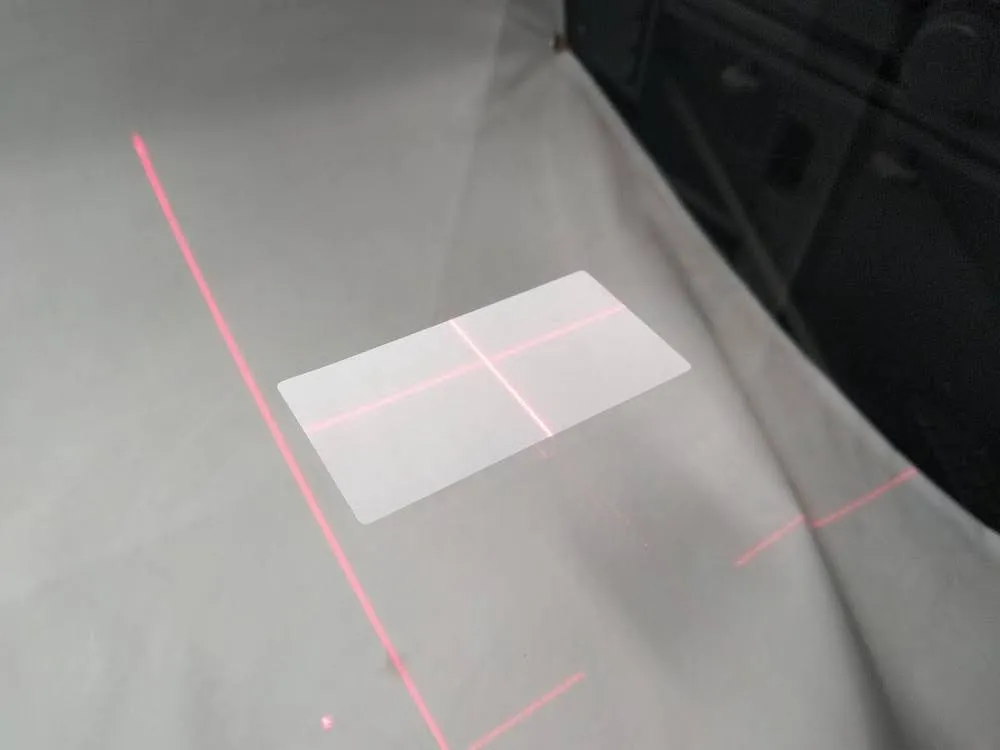
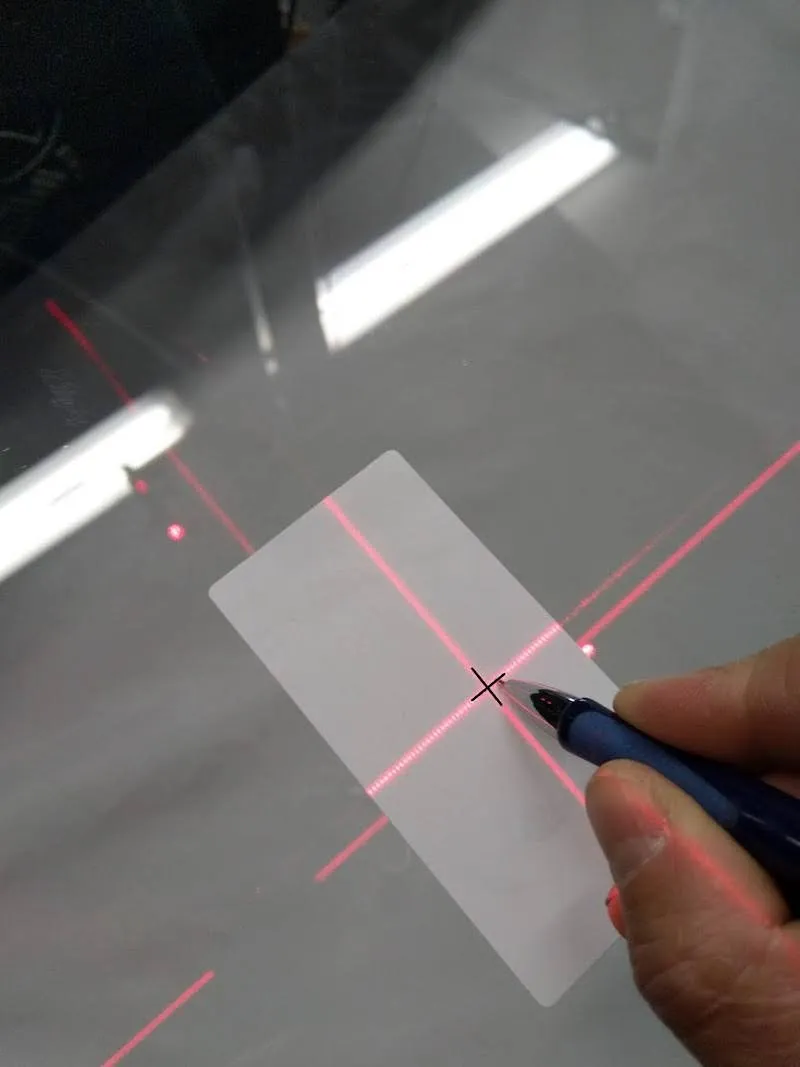
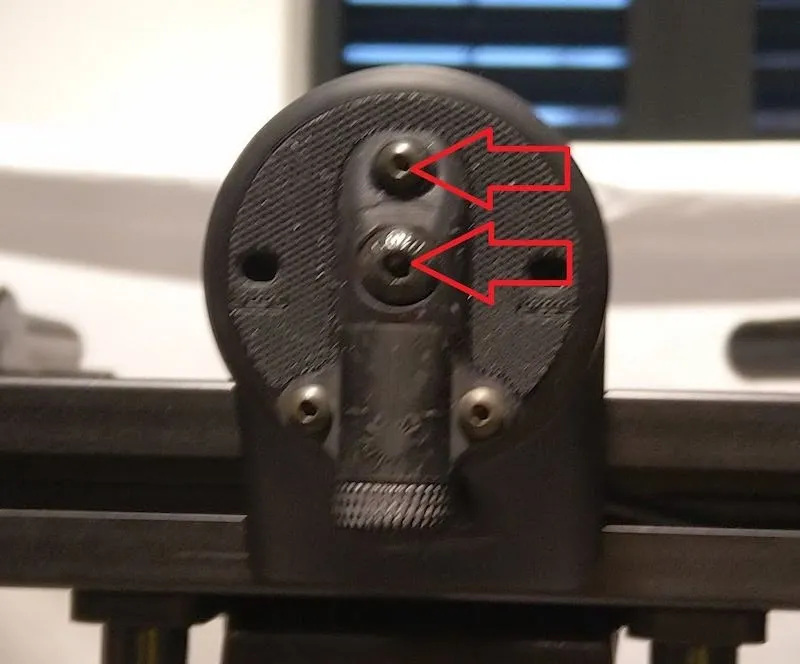
2.1. Khi tia laser được gắn chặt vào vị trí, hãy dán nhãn dán lên tấm bàn xoay ở điểm giữa gần đúng của kính. Các tia laser sẽ trở nên rõ ràng hơn trên nhãn dán, giúp ước tính tốt hơn điểm trung tâm của tấm.
2.2. Điều chỉnh cả hai tia laser bằng tay để căn chỉnh trên nhãn dán ước tính điểm giữa gần đúng.
3. Tinh chỉnh căn chỉnh laser
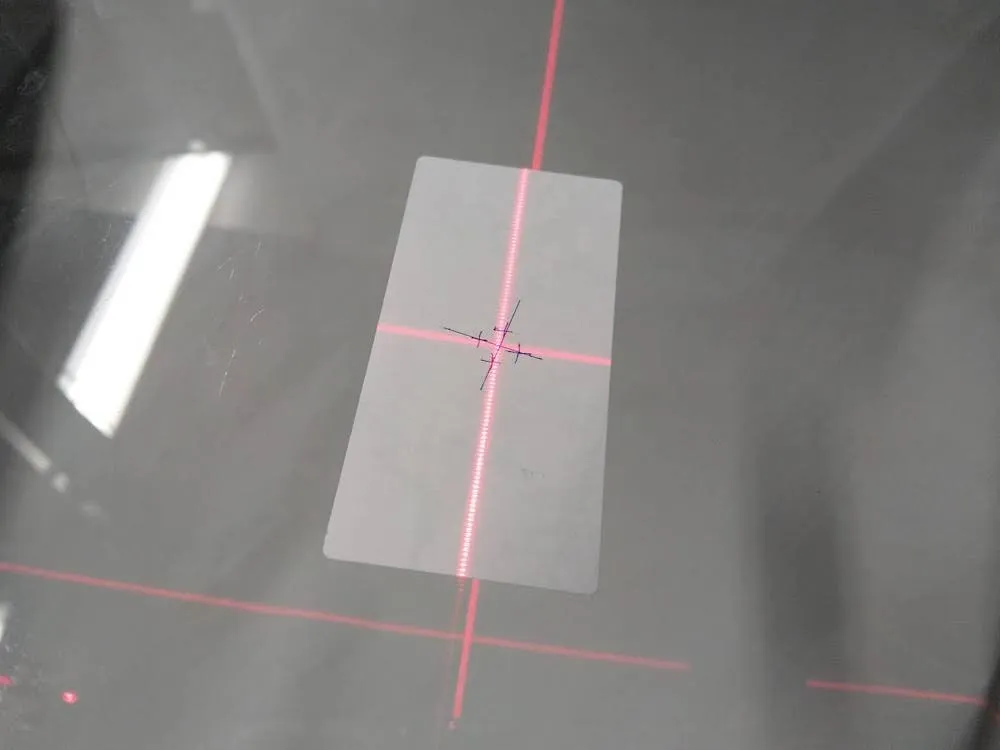
3.1. Vẽ một dấu chéo nhỏ trên nhãn dán sao chép chữ thập đỏ của tia laser.
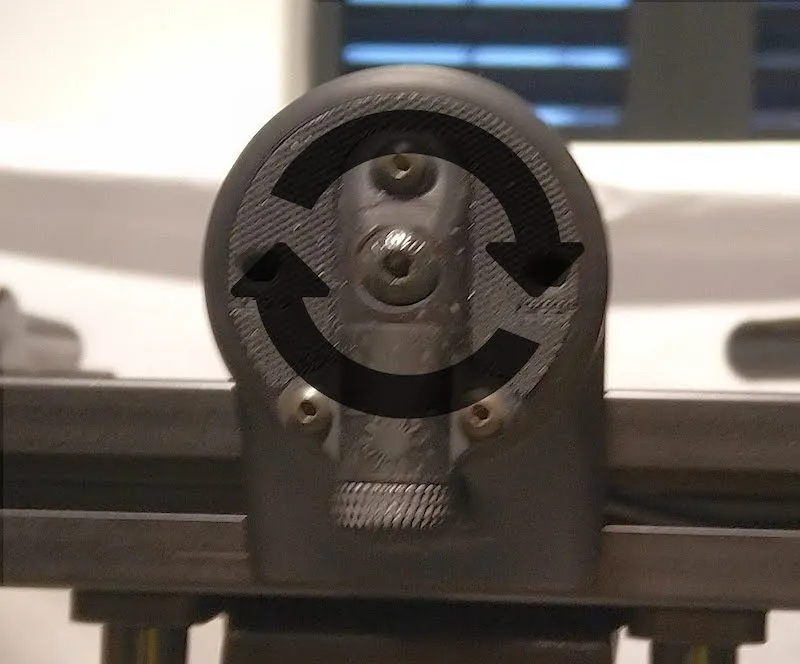
3.2. Tiếp theo, khởi động ứng dụng Định vị trên điện thoại di động của bạn, tìm Thiết bị điều khiển được chỉ định cho rô bốt và truy cập GUI dịch vụ. Ghi: Để biết hướng dẫn chi tiết về mạng, hãy tham khảo Điều kiện tiên quyết về mạng chi tiết của PhotoRobot (phần 8: Thông tin phụ lục). Sau đó, tìm Thiết bị điều khiển được chỉ định cho rô bốt và truy cập GUI của nó.
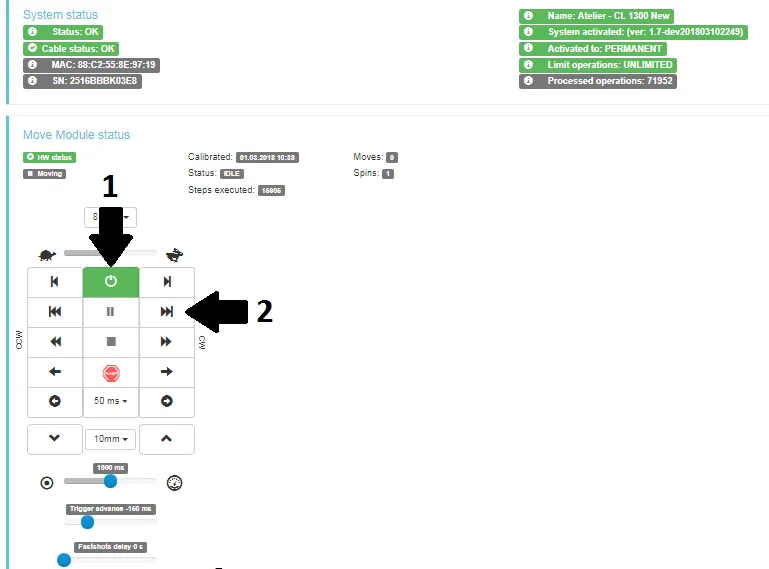
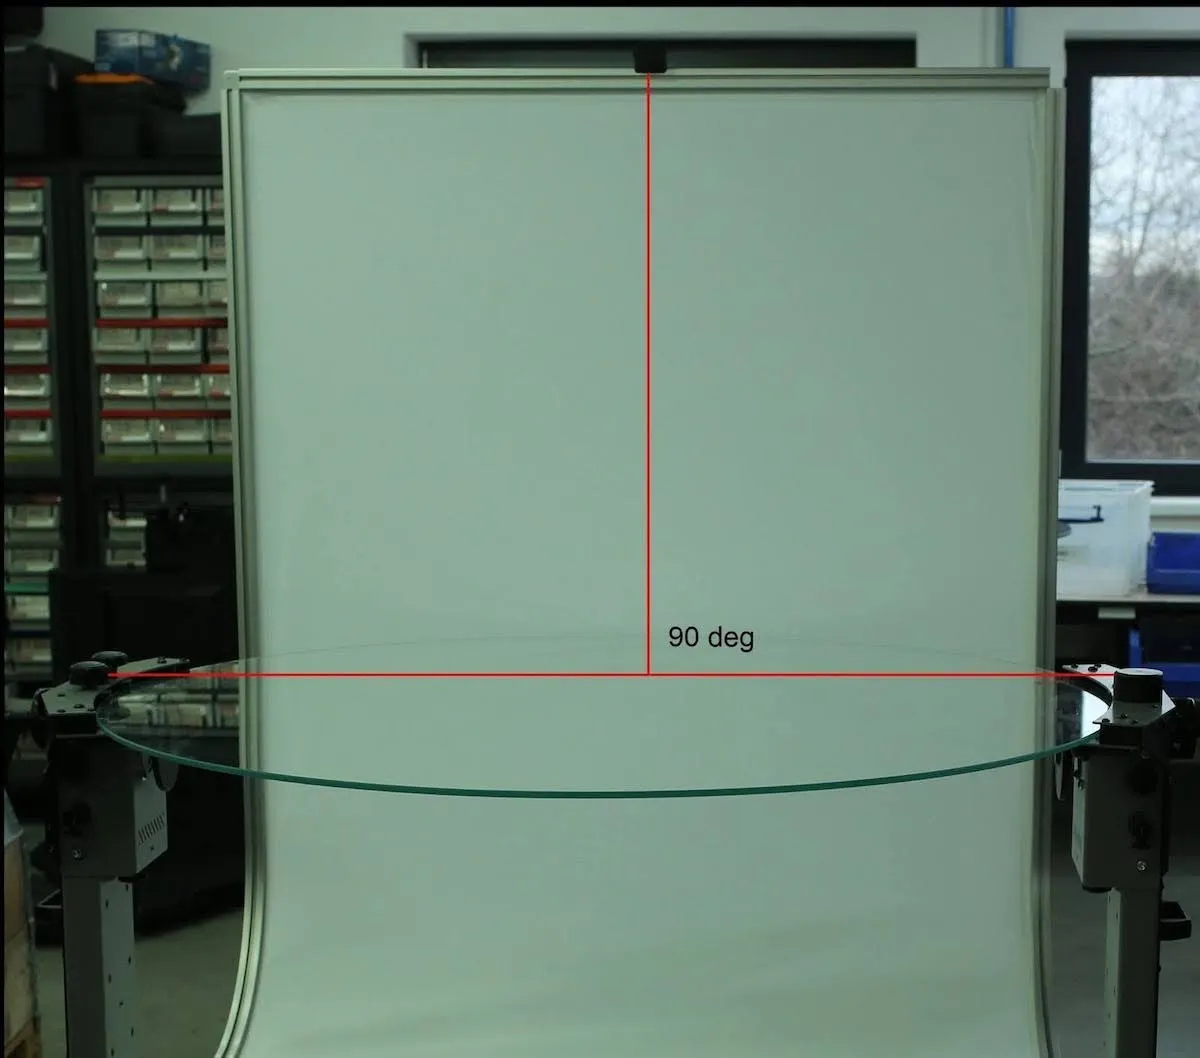
3.3. Trong GUI dịch vụ, sử dụng các điều khiển rẽ để xoay kính 90 độ và theo dõi lại vị trí của các tia laser chéo lên nhãn dán. Lặp lại bước này hai lần: xoay kính 90 độ, theo dõi chữ thập laser, xoay 90 độ và theo dõi chữ thập laser lần cuối.
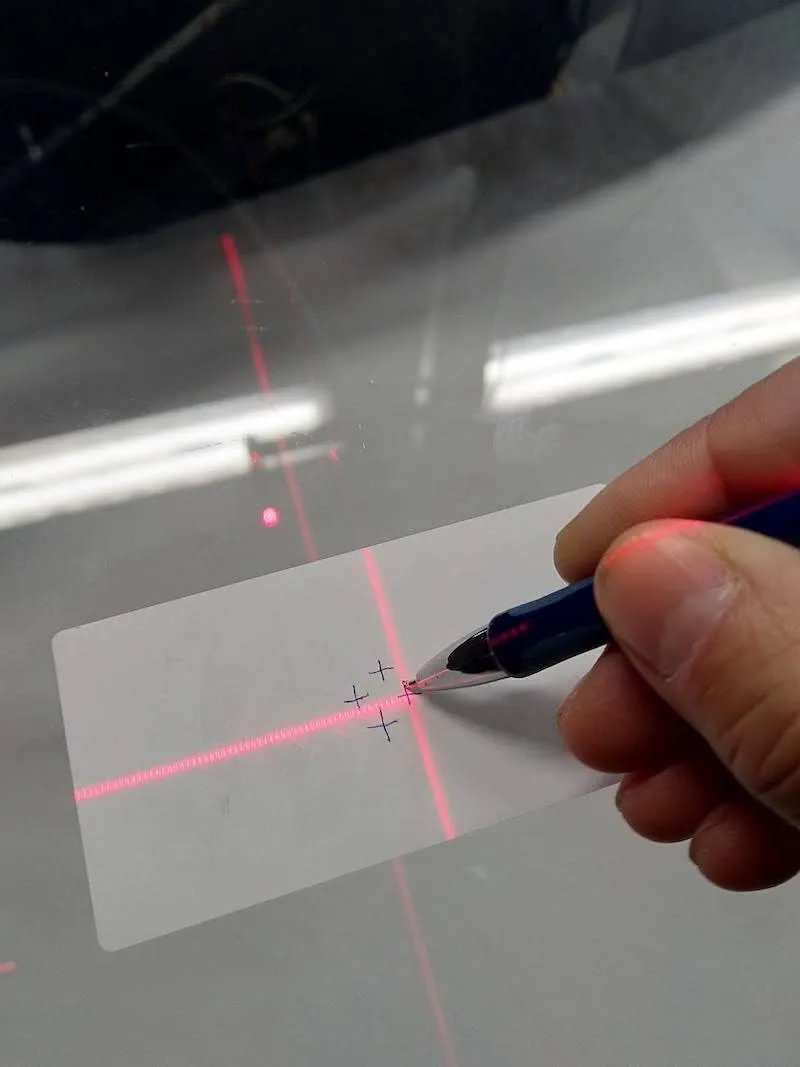
3.4. Sau khi vẽ bốn chữ thập trên nhãn dán, hãy nối từng chữ thập đối diện bằng các đường thẳng. Kết quả giao nhau giữa các chữ thập riêng lẻ sẽ đại diện cho điểm giữa thực tế của tấm kính.
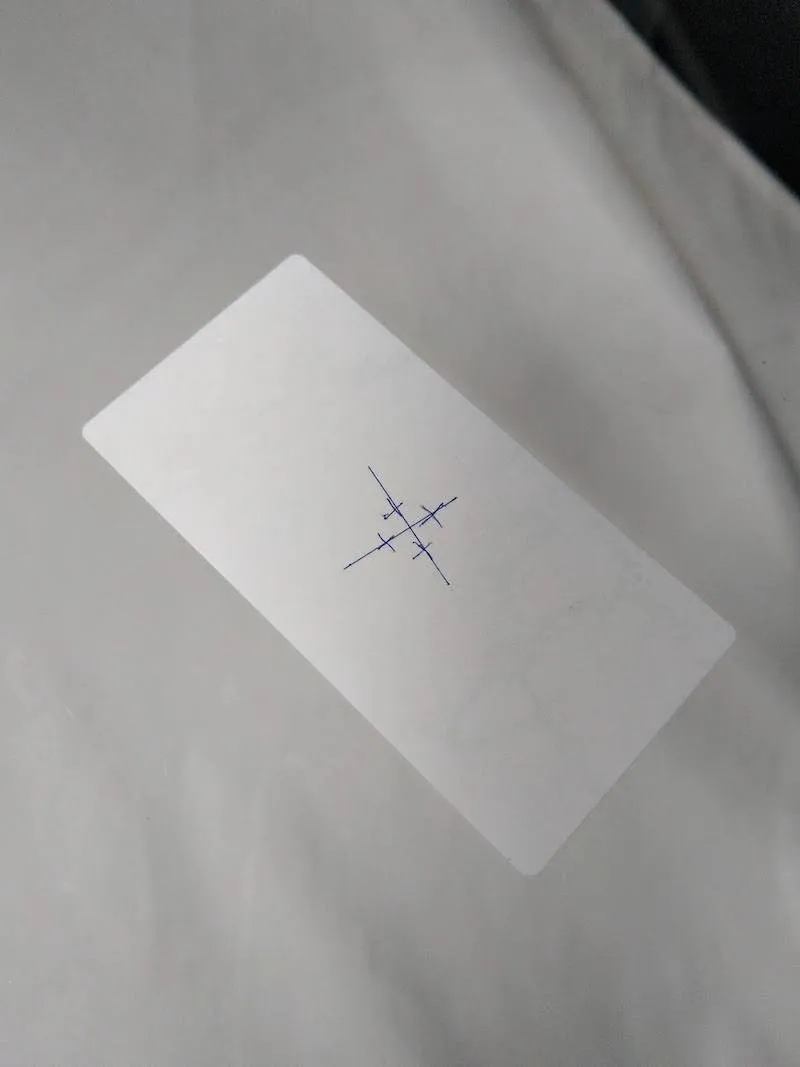
3.5. Cuối cùng, điều chỉnh cả hai tia laser đến điểm giữa đã xác định. Hệ thống laser bây giờ sẽ được căn giữa và căn chỉnh với tâm tuyệt đối của vòng quay của tấm.
4. C1300 Căn chỉnh và định tâm laser đặc biệt
4.1. Khi căn chỉnh và căn giữa các tia laser trên rô-bốt C1300, hãy lưu ý hệ thống laser chuyên dụng. Hệ thống laser C1300 có một số điểm khác biệt so với các PhotoRobot khác. Mặc dù các nguyên tắc vật lý giống nhau, nhưng cấu tạo của hệ thống laser C1300 có tính năng lắp đặt bốn tia laser.
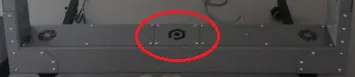
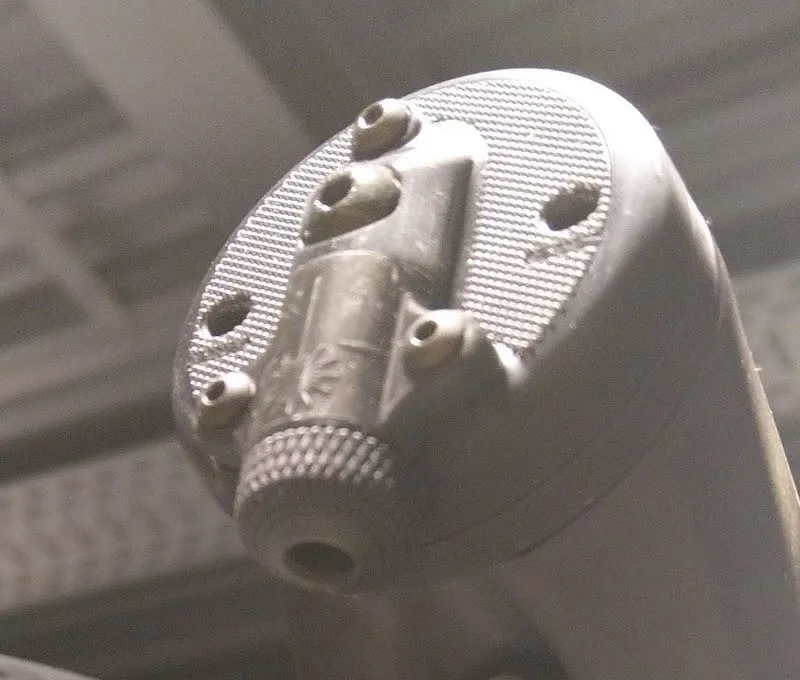
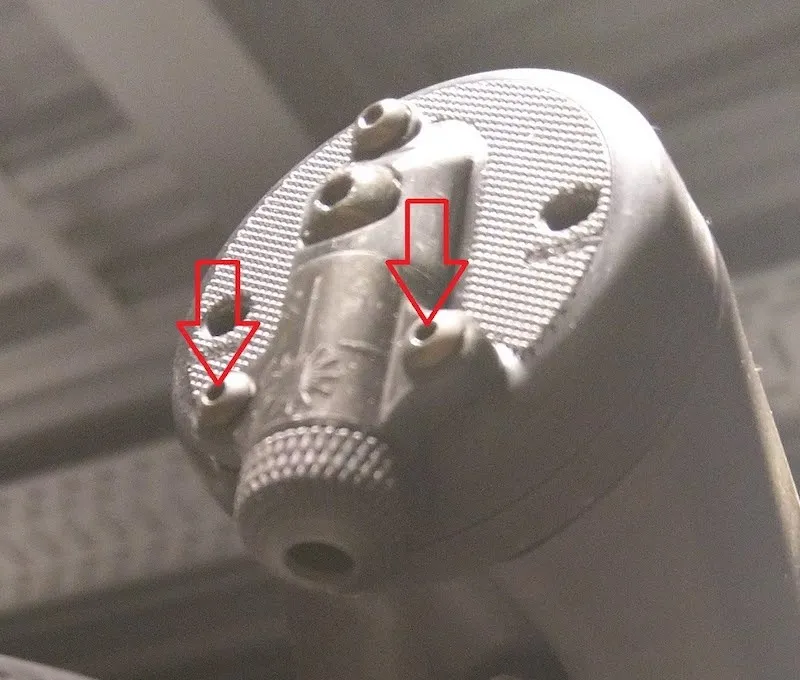
4.2. Trong hệ thống này, Laser 4 là một phần không thể thiếu của bộ xương robot C1300. Laser 4 là một tia laser chéo, và nó chiếu qua nền trắng từ phía dưới. Để điều chỉnh vị trí tia laser, hãy tìm bốn vít màu bạc để mở phần hình vuông trung tâm chứa tia laser.
4.3. Sau khi mở vỏ phần hình vuông trung tâm của Laser 4, hãy sử dụng hai vít giữ vỏ laser bằng nhựa để điều chỉnh vị trí của nó theo cách thủ công.
Ghi: Laser 1, Laser 2 và Laser 3 đều có cấu tạo giống như Laser 4. Chúng cũng là tất cả các tia laser dòng:
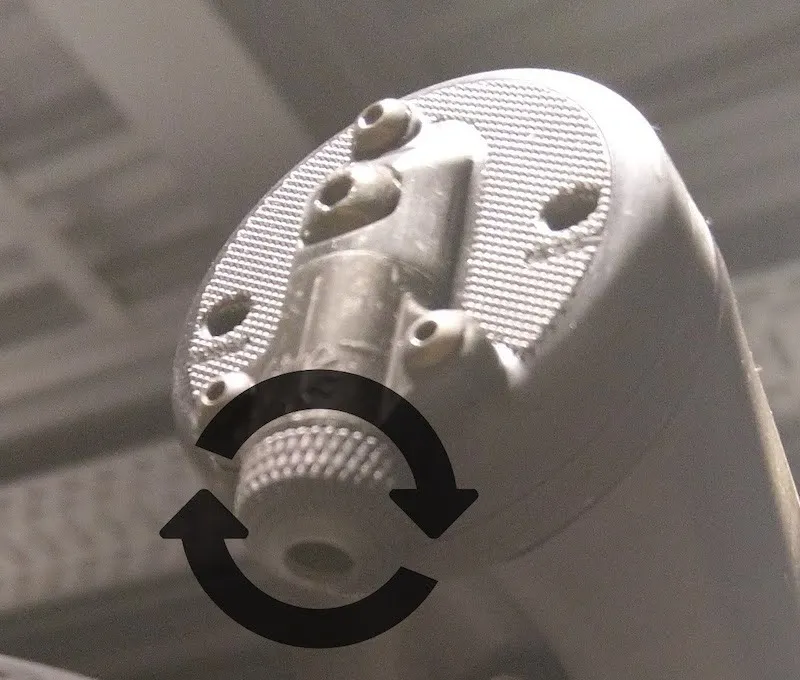
4.4. Cuối cùng, khi căn chỉnh và căn giữa tia laser, hãy đảm bảo có một góc 90 độ giữa vạch laser từ tia laser trên cùng và tấm kính.


Dòng EOS Rebel


Dòng EOS DSLR


EOS M Mirrorless Series


Dòng PowerShot


Cận cảnh / cầm tay

Dòng Canon EOS Rebel cung cấp máy ảnh DSLR thân thiện với người mới bắt đầu với chất lượng hình ảnh chắc chắn, điều khiển trực quan và các tính năng linh hoạt. Lý tưởng cho những người đam mê nhiếp ảnh, những máy ảnh này cung cấp khả năng lấy nét tự động đáng tin cậy, màn hình cảm ứng có thể thay đổi góc và quay video Full HD hoặc 4K.
Kết nối
Độ phân giải (MP)
Nghị quyết
Dòng Canon EOS DSLR mang lại hình ảnh chất lượng cao, lấy nét tự động nhanh và tính linh hoạt, lý tưởng cho cả nhiếp ảnh và sản xuất video.
Kết nối
Độ phân giải (MP)
Nghị quyết
Dòng máy ảnh không gương lật Canon EOS M kết hợp thiết kế nhỏ gọn với hiệu suất giống như máy ảnh DSLR. Với ống kính có thể hoán đổi cho nhau, lấy nét tự động nhanh và cảm biến hình ảnh chất lượng cao, những chiếc máy ảnh này rất phù hợp cho khách du lịch và người sáng tạo nội dung đang tìm kiếm tính di động mà không làm giảm chất lượng hình ảnh.
Kết nối
Độ phân giải (MP)
Nghị quyết
Dòng Canon PowerShot cung cấp máy ảnh nhỏ gọn, thân thiện với người dùng cho những người chụp ảnh bình thường và những người đam mê. Với các mô hình khác nhau, từ máy ảnh ngắm và chụp đơn giản đến máy ảnh zoom tiên tiến, chúng mang lại sự tiện lợi, chất lượng hình ảnh chắc chắn và các tính năng như ổn định hình ảnh và video 4K.
Kết nối
Độ phân giải (MP)
Nghị quyết
Máy ảnh Canon Close-Up & Handheld được thiết kế để chụp ảnh và quay video chi tiết, cận cảnh. Nhỏ gọn và dễ sử dụng, chúng cung cấp khả năng lấy nét chính xác, hình ảnh độ phân giải cao và khả năng macro linh hoạt—hoàn hảo cho vlog, chụp ảnh sản phẩm và cận cảnh sáng tạo.
Kết nối
Độ phân giải (MP)
Nghị quyết


