
Hướng dẫn sử dụng Broncolor Siros 800 S WiFi / RFS 2
Hướng dẫn vận hành sau đây cho Broncolor Siros 800 S là bản sao của các vật liệu chính thức từ nhà sản xuất để khách hàng PhotoRobot tham khảo nhanh. Những tài liệu này nhằm hỗ trợ việc hiểu biết ban đầu và vận hành độc lập thiết bị Broncolor Siros 800 S của họ. Tuy nhiên, hãy lưu ý rằng đèn Broncolor được quản lý trực tiếp trong PhotoRobot _Controls App. Điều này đảm bảo không cần cài đặt trình điều khiển quản lý phần cứng Broncolor từ phía khách hàng.
Để biết thông tin kỹ thuật về các thành phần phần cứng, công cụ phần mềm, chế độ chính và các thiết lập được khuyến nghị cho đèn Broncolor với PhotoRobot, hãy tham khảo PhotoRobot – Quản lý Đèn Broncolor.
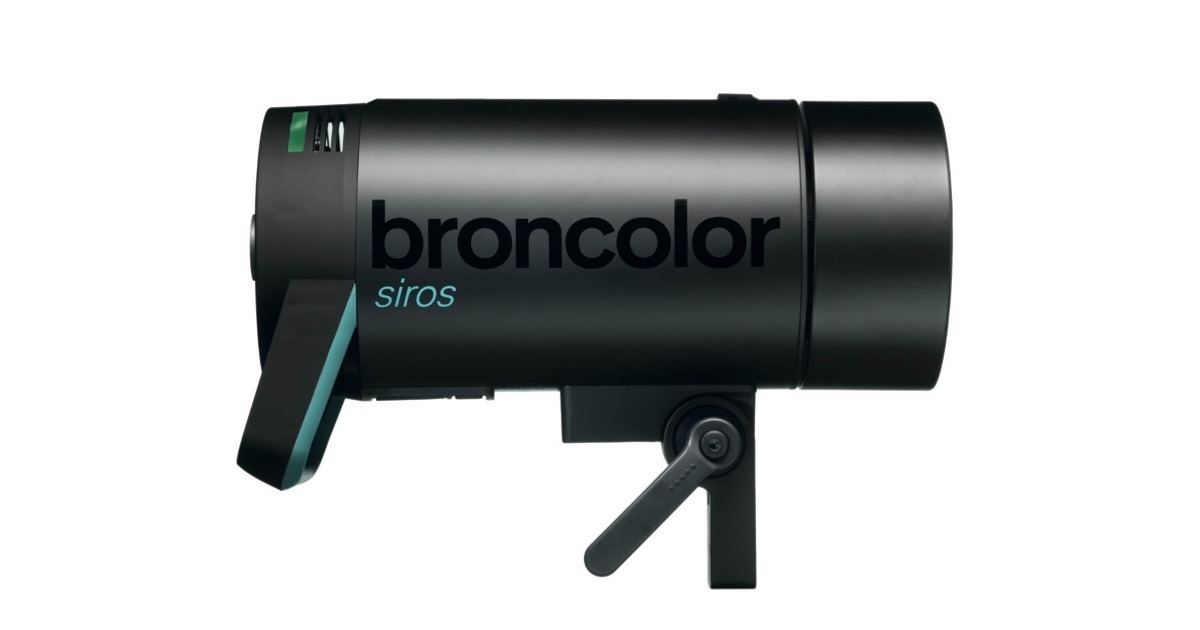
Lưu ý: Các hướng dẫn sử dụng này là bản sao của hướng dẫn vận hành chính thức do nhà sản xuất thực hiện cho đèn studio Broncolor Siros 8 S series. Tham khảo trang web của nhà sản xuất broncolor.swiss để biết tài liệu gốc về sản phẩm của bạn. Đồng thời, hãy chắc chắn tuân thủ bất kỳ hướng dẫn nào được cung cấp riêng cho thiết bị của bạn trước khi sử dụng lần đầu.
Điều khiển và Hiển thị
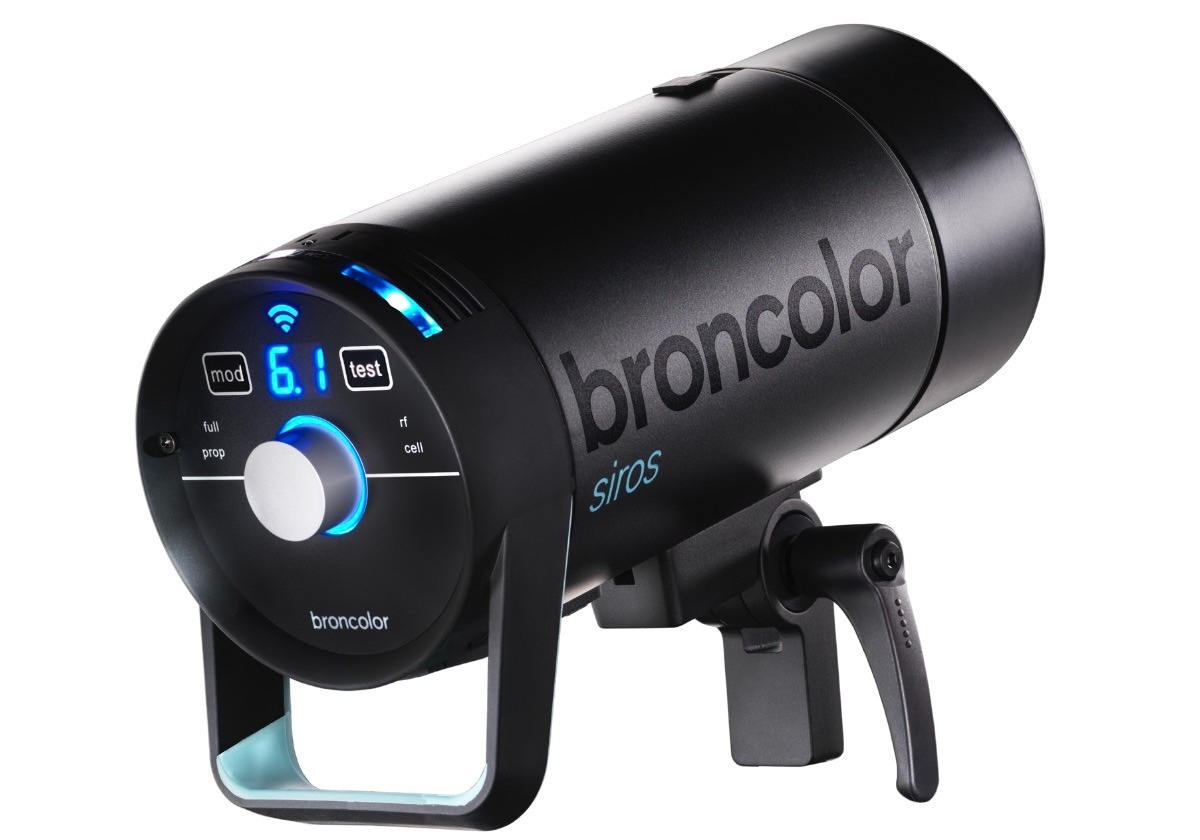
Bảng điều khiển và màn hình cho Broncolor Siros 800 S như sau.
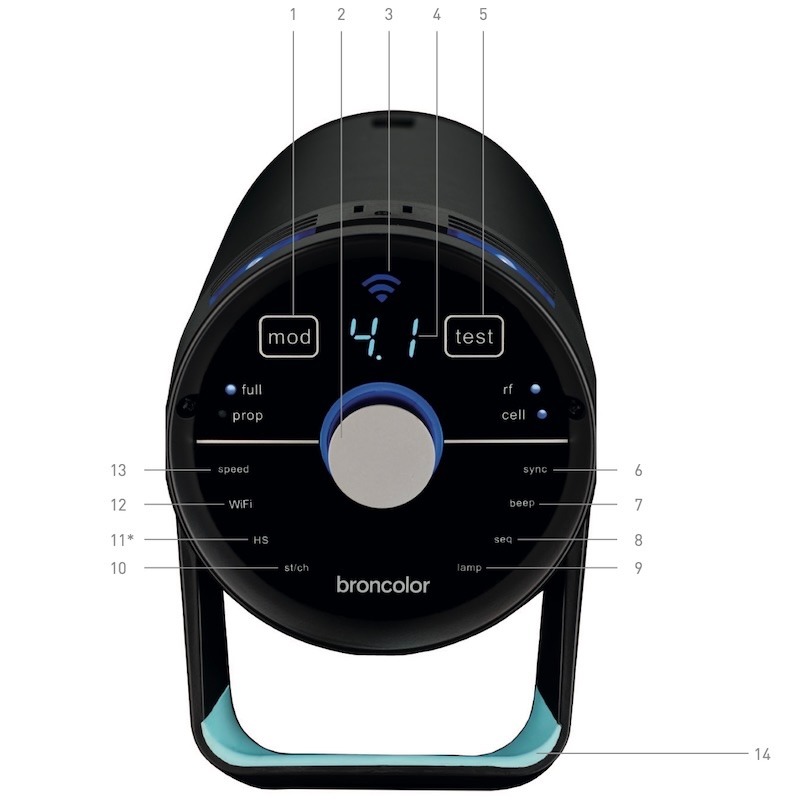
- Bật/tắt đèn mô hình
- Bộ điều khiển quay
- Màn hình WiFi
- Màn hình phân phối điện kỹ thuật số
- phím "kiểm tra"
- Cài đặt menu
- Cài đặt menu
- Cài đặt menu
- Cài đặt menu
- Cài đặt menu
- Cài đặt menu
- Cài đặt menu
- Cài đặt menu
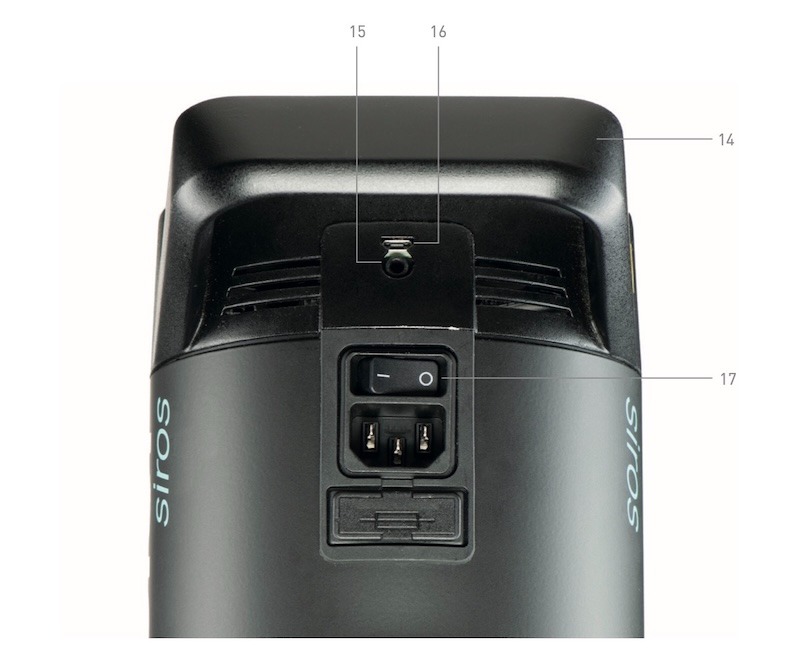
- Tay cầm
- Ổ cắm đồng bộ
- Mini USB
- Công tắc nguồn điện
Trước khi sử dụng
Broncolor Siros S là sản phẩm chất lượng cao với nhiều năm sử dụng nếu sử dụng đúng cách. Hãy chắc chắn đọc kỹ tất cả thông tin trong các hướng dẫn vận hành này, trong đó cũng có các hướng dẫn quan trọng về cách sử dụng và bảo trì thiết bị. Hướng dẫn người dùng tiếp theo theo các hướng dẫn này để người mới làm quen với thiết bị, cách sử dụng và bảo trì. Ngoài ra, luôn tuân thủ các hướng dẫn an toàn được cung cấp riêng cho thiết bị của bạn với Broncolor.
Mục lục
- Phạm vi cung cấp
- Khởi nghiệp đầu tiên
- Các phần tử điều khiển
- Tổng quan về các chức năng của menu chính
- Điều hướng menu
- Kiểm soát thời gian nhấp nháy
- Phát hành
- Hàm HS
- Chức năng đặc biệt
- Thông tin và Thông báo lỗi
- Câu hỏi thường gặp
- Phụ kiện
- Bảo trì / Sửa chữa
- Thông tin Bảo vệ Môi trường
- Bảo hành và Thông báo cho khách hàng tại Vương quốc Anh
- Thông số kỹ thuật
1. Phạm vi cung cấp
1.1. Siros 800 S WiFi / RFS 2 – 31.643.XX
Trước tiên, hãy đảm bảo rằng bạn đã nhận được các mặt hàng sau trong quá trình giao hàng.
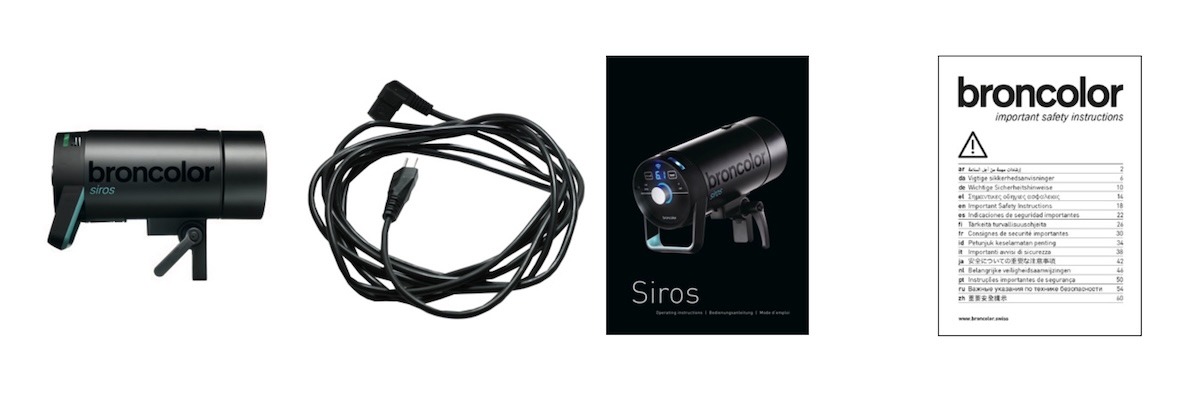
- Siros S Monolight
- Cáp điện
- Hướng dẫn vận hành (BA109.00)
- Hướng dẫn an toàn quan trọng (WA-18-1)
1.2. Bộ dụng cụ
Nội dung bộ dụng cụ chuyên gia Siros bao gồm:
- 2× Siros 800 S WiFi / RFS 2
- 1× Ô, 85 cm (33.574.00)
- 1× Softbox 60 x 60 (33.561.00)
- 1× Vòng tốc độ (33.401.00)
- 2× Khán đài thiếu nhi điều hòa (35.100.00)
- 1× Túi Flash 2 (36.532.00)
- 1× Túi phụ kiện (36.535.00)
- 1× Cáp đồng bộ (34.111.00)
Nội dung của Siros Pro Kit bao gồm:
- 3× Siros 800 S WiFi / RFS 2
- 1× Softbox 60 x 60 (33.561.00)
- 1× Octabox 75 (33.600.00)
- 2× Vòng tốc độ (33.401.00)
- 2× Gương phản quang tiêu chuẩn L40 (33.115.00)
- 3× Khán đài thiếu nhi điều hòa (35.100.00)
- 1× Túi Flash 3 (36.533.00)
- 1× Túi phụ kiện (36.535.00)
- 1× Cáp đồng bộ (34.111.00)
2. Khởi nghiệp đầu tiên
2.1. Tháo Nắp Bảo Vệ
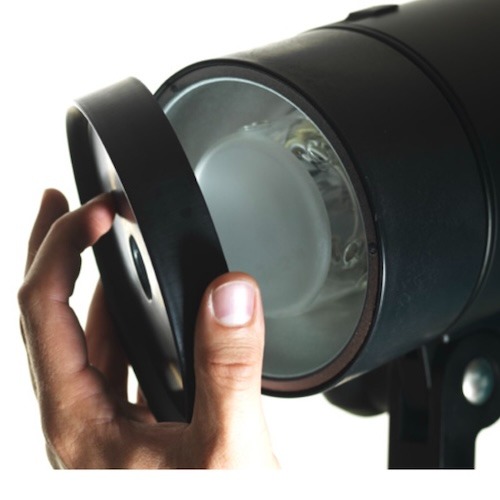
2.2. Cắm cáp điện lưới
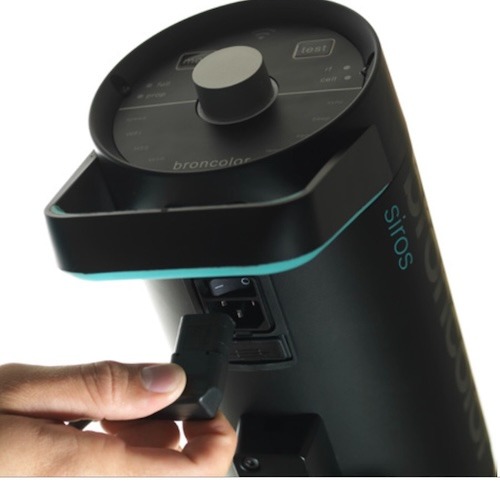
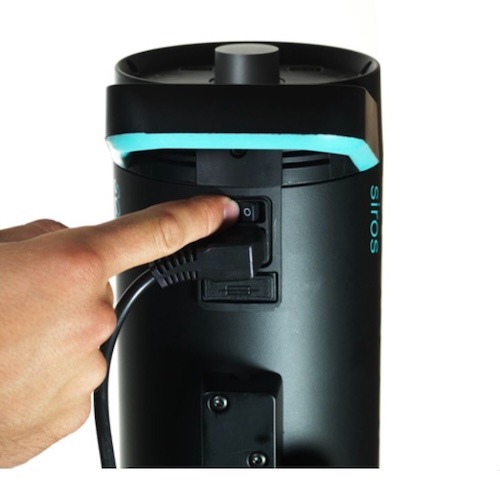
2.3. Bật thiết bị tại công tắc chính
3. Các phần tử điều khiển
3.1. Chức năng phần tử
Bộ điều khiển quay (2)

- Bộ điều khiển quay (2) có chức năng bật tắt thiết bị (chế độ chờ). Nhấn bộ điều khiển quay trong 3 giây sẽ chuyển thiết bị sang chế độ chờ.
- Trong menu, bộ điều khiển quay cho phép điều hướng menu và xác nhận các mục menu. Có giải thích thêm về điều hướng menu ở chương 5.
- Khi hoạt động, bộ điều khiển quay sẽ thay đổi năng lượng nhấp nháy. Quay ngược chiều kim đồng hồ sẽ giảm năng lượng nhấp nháy, trong khi quay theo chiều kim đồng hồ sẽ tăng năng lượng nhấp nháy. Trong khi đó, xoay bộ điều khiển sẽ thay đổi năng lượng chậm theo 1/10 f-stop, và quay nhanh ("xoắn") theo bước 1/1 f-stop.
Màn hình thông tin (4)
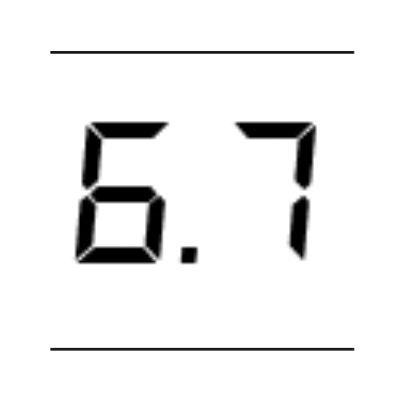
- Màn hình hiển thị thông tin (4) hiển thị năng lượng đèn flash đã chọn, hoặc các tùy chọn trong menu.
Mod - Đèn mô hình BẬT / TẮT (1)
- Sử dụng "mod" (1) để bật hoặc tắt đèn mô hình. Nhấn lâu hơn một nút sẽ chuyển chế độ hoạt động từ "full" sang "prop" hoặc ngược lại.
Kiểm tra (5)

- Sử dụng "test" (5) sẽ bắt đầu quá trình kiểm tra. Màn hình "Ready" quanh bộ điều khiển quay sẽ chuyển sang màu xanh ngay khi quá trình sạc/xả hoàn tất.
3.2. Chức năng menu
Tốc độ (13)
- Cài đặt menu "tốc độ" (13) dành cho sạc nhanh và thời gian nhấp nháy. Tìm giải thích chi tiết hơn trong chương 6 của hướng dẫn vận hành này.
WiFi (12)
- "WiFi" (12) cho biết WiFi đã được bật hay tắt.
HS (11)

- "HS" chỉ ra liệu HS đang bật hay tắt.
Phòng thu / Kênh (10)
- Cài đặt menu "st / ch" (10) dùng để thay đổi phòng thu / kênh. Sử dụng nó để chuyển kênh phòng thu hiện tại (RFS 2).
Đèn (9)

- Sử dụng đèn cài đặt menu (9) để chọn kênh đèn (RFS 2).
Trình tự (8)
- Cài đặt menu "seq" (8) chọn số lần nhấp nháy.
Tiếng bíp (7)

- Chức năng menu "bíp" (7) cho biết cảnh báo âm thanh "Sẵn sàng" đã được bật hoặc tắt.
Đồng bộ (6)
- Sử dụng "đồng bộ" (6) cho phép lựa chọn các phương pháp giải phóng khác nhau (quang học, radio, quang học và/hoặc radio).
Ổ cắm đồng bộ / Mini USB (15 / 16)

- Sử dụng các chức năng menu Sync socket / Mini USB (15 / 16) để mở qua cáp đồng bộ, hoặc cập nhật phần mềm qua mini USB.
Bật / Tắt (17)

- Sử dụng bật/tắt (17) trên thiết bị để bật hoặc tắt.
4. Tổng quan về các chức năng chính
Các chức năng chính như sau.
- Để vào menu chính, nhấn nút điều khiển quay (2).
- Xoay bộ điều khiển quay (2) theo chiều kim đồng hồ hoặc ngược chiều kim đồng hồ để đến mục menu cần thiết.
- Để xác nhận lựa chọn của bạn, nhấn lại bộ điều khiển quay (2). Mục menu đã chọn bắt đầu nhấp nháy.
5. Điều hướng menu
Các chức năng trong menu của Broncolor Siros 800 S bao gồm:
- tốc độ
- WiFi
- HS
- st/ch
- đèn
- seq
- bíp
- đồng bộ
Sau khi nhấn nút điều khiển quay (2), bạn vào menu chính của đèn đơn. Từ đó, bạn có thể truy cập vào các chức năng khác nhau.
Lưu ý: Nếu không thể chọn một mục trong menu, chẳng hạn như với các sản phẩm khác ngoài Siros 800 S, thiết bị sẽ không hỗ trợ chức năng đó.
Ví dụ: Thiết lập chuỗi 15 lần nhấp nháy cho mỗi lần phát hành.
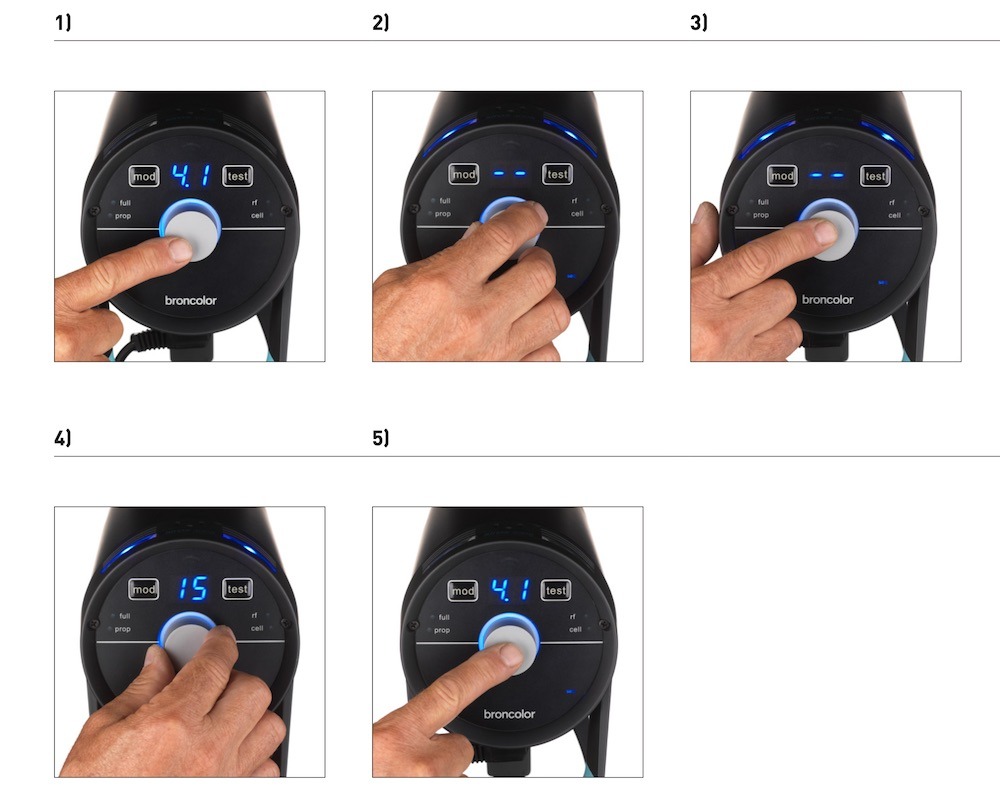
- Nhấn bộ điều khiển quay (2) để vào menu chính. Mục menu được chọn cuối cùng sẽ được hiển thị. Màn hình chính chuyển từ công suất đầu ra sang mục menu đã chọn.
- Xoay bộ điều khiển quay (2) cho đến khi bạn đến mục menu "seq".
- Nhấn bộ điều khiển quay (2) để xác nhận chức năng này. Màn hình "seq" bắt đầu nhấp nháy.
- Xoay bộ điều khiển quay (2) cho đến khi xuất hiện "15" trên màn hình chính.
- Xác nhận lựa chọn này bằng cách nhấn bộ điều khiển quay (2). Sau khi xác nhận này, thiết bị sẽ chuyển về trạng thái bình thường. Nếu lựa chọn không được xác nhận trong vòng 5 giây, thiết bị sẽ chuyển về trạng thái bình thường mà không thay đổi cài đặt.
6. Kiểm soát thời gian nhấp nháy
Trong menu chính, bạn có thể đặt thời gian nhấp nháy của đèn đơn là "tốc độ". Thiết lập này tính thời gian nhấp nháy nhanh nhất có thể cho mức năng lượng đã chọn. Điều này cũng có thể khiến màu nhấp nháy dịch chuyển nhẹ về phía vùng xanh dương.
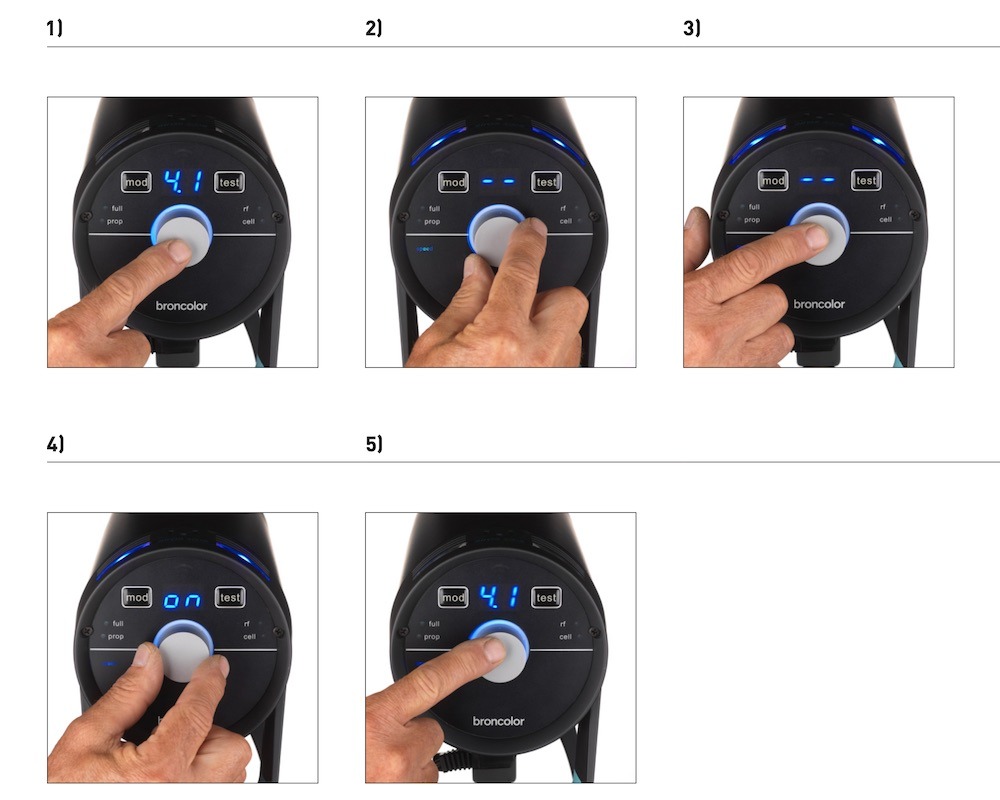
- Nhấn bộ điều khiển quay (2) để vào menu chính.
- Xoay bộ điều khiển quay (2) cho đến khi bạn đến mục menu "tốc độ".
- Xác nhận lựa chọn này bằng cách nhấn bộ điều khiển quay (2).
- Sử dụng bộ điều khiển quay (2) để chọn tùy chọn "bật" hoặc "tắt".
- Xác nhận điều này với bộ điều khiển quay (2).
7. Phát hành
7.1. Mô-đun RFS 2 (Hệ thống tần số vô tuyến)
Đối với điều khiển đèn flash RFS 2, kênh (địa chỉ phòng thu) phải tương ứng với kênh của bộ phát. Địa chỉ phòng thu được thiết lập trong menu tại vị trí "st". Kênh đèn được định nghĩa trong menu dưới mục "lamp". Tham khảo mục 9.3 để biết thêm thông tin về việc thay đổi màu sắc của đèn nhận thức.
Với bộ thu phát radio, bạn có thể định nghĩa và thiết lập từng bóng đèn theo ý muốn. Để tìm hiểu cách làm điều này, vui lòng xem hướng dẫn vận hành của bộ thu phát. Bộ thu phát không được trang bị tiêu chuẩn với từng đầu phát riêng lẻ.
7.2. Tế bào quang (Cell)
Quang tế bào có thể được bật tắt bằng chức năng menu "đồng bộ" (6). Khi chế độ này hoạt động, đèn LED màu xanh bên cạnh nhãn "cell" sẽ sáng. Sau lần nhấp nháy đầu tiên của chuỗi, quang tế bào đang hoạt động sẽ bị tắt, và đèn LED xanh bên cạnh phím "đồng bộ" (6) nhấp nháy. Nhấn phím "test" sẽ bật lại nó.
7.3. Ổ cắm đồng bộ (15)
Các cáp đồng bộ – dài 5m (16,4ft) (Mã sản xuất) Số 34.111.00) và cáp 10m (32,8ft) (34.112.00) – có thể được lắp vào ổ cắm để tháo cáp (15).
7.4. Khóa "kiểm tra" (5)
Sử dụng phím này, đèn đơn có thể được kích hoạt thủ công. Đèn flash có thể được kích hoạt ngay khi đạt 70% mức năng lượng đã đặt. Ngược lại, chỉ báo "Sẵn sàng" trực quan chỉ sáng khi đạt 100%.
8. Chức năng HS
Kết hợp với bộ phát RFS 2.2, bạn có thể sử dụng Siros 800 S monolight với tốc độ màn trập cực nhanh. Ví dụ, với ánh sáng môi trường, ngay cả khi khẩu độ mở rộng (lấy nét chọn lọc), hình ảnh vẫn có thể bị thiếu sáng đúng cách với tốc độ lên đến 1/8000, và Siros vẫn cho phép bạn thiết lập hiệu ứng ánh sáng chủ đạo và sáng tạo.
Tất cả những gì bạn cần cho việc này là bộ phát RFS 2.2, có sẵn cho các máy ảnh Canon, Fuji, Nikon và Sony. Ngoài ra, HS phải được kích hoạt trên tất cả các thiết bị Siros. Điều này điều chỉnh đường cong đèn flash và đảm bảo, kết hợp với RFS 2.2, phơi sáng chính xác mà không giới hạn tốc độ màn trập bạn chọn.
Vui lòng đọc hướng dẫn vận hành cho bộ phát RFS 2.2 để tìm hiểu thêm về cách sử dụng tối ưu chức năng HS.
Khi làm việc ở chế độ HS, bạn chỉ có thể sử dụng mức công suất flash từ 4 đến 10 với Siros.
9. Chức năng đặc biệt
9.1. Đặt lại (về cài đặt gốc)
Nhấn phím "test" (5) trong 4 giây. Việc này sẽ đặt lại tất cả các chức năng về cài đặt gốc. Việc đặt lại được xác nhận bằng tiếng bíp kép.
9.2. Cài đặt ứng dụng và WiFi "bronControl"
Để điều khiển monolight Siros, bạn cũng có thể tải ứng dụng "bronControl" miễn phí. Để tìm ứng dụng, hãy tìm kiếm "bronControl" trên App Store của Apple hoặc trên Google Play Store.
9.2.1. Chế độ vận hành
9.2.1.1. Hoạt động ở chế độ "riêng tư" (Cài đặt nhà máy)
Nếu chế độ WiFi được kích hoạt trên nhiều hơn một đèn đơn, tất cả các thiết bị này sẽ tự động kết nối với cùng một địa chỉ studio để tạo thành một mạng riêng. Sau đó, điện thoại thông minh hoặc máy tính bảng phải kết nối với mạng này để điều khiển. Để sử dụng, hãy kích hoạt chức năng WiFi trên điện thoại hoặc máy tính bảng của bạn. Thiết bị của bạn sẽ tự động tìm kiếm các mạng WiFi có sẵn. Kết nối điện thoại thông minh hoặc máy tính bảng của bạn với mạng Bron-Studio phù hợp. Mật khẩu kết nối là: bronControl. Bây giờ hãy khởi động ứng dụng "bronControl" trên thiết bị của bạn. Thêm số studio phù hợp vào mục "thêm studio mới" và kết nối ứng dụng với studio này. Để biết thêm hướng dẫn về cách sử dụng, vui lòng sử dụng chức năng trợ giúp "?" trong ứng dụng.
9.2.1.2. Vận hành ở chế độ "Doanh nghiệp"
Nếu đã có mạng WiFi (router), thiết bị có thể được tích hợp vào mạng này bằng điện thoại thông minh hoặc máy tính bảng. Để làm điều này, trong ứng dụng "bronControl", ở phần cài đặt, vào "Cài đặt mạng" và nhập cài đặt router ở chế độ "enterprise". Đảm bảo các thiết bị được đặt đúng địa chỉ studio. Siros lưu loại kết nối cuối cùng và cố gắng kết nối với mạng cuối cùng vào lần khởi động tiếp theo.
9.2.2. Cài đặt menu
Cài đặt menu được định nghĩa như sau: bật / tắt / đồng bộ (bật / -- / sy).
9.2.3. Màn hình WiFi (3) trên thiết bị
Các biểu tượng và mô tả của chúng cho màn hình Wifi (3) trên thiết bị như sau.
9.3. Ánh sáng nhận thức
Khi các kênh đèn khác nhau được chọn (vùng), đèn nhận thức trên bề mặt trên cùng của thiết bị sẽ đổi màu. Mục đích của việc này là để phân biệt giữa các thiết bị riêng lẻ khi chúng được điều khiển bởi ứng dụng "bronControl". Đèn trên thiết bị sẽ đổi màu khi ứng dụng được kích hoạt trên điện thoại thông minh hoặc máy tính bảng hoặc khi thao tác điều khiển quay trên thiết bị được nhấn; đèn sẽ chuyển lại màu xanh khi rời khỏi menu.
Màu sắc của kênh đèn như sau.
10. Thông tin và Thông báo lỗi*
10.1. Tín hiệu âm học
Tín hiệu âm học là tiếng bíp hoặc tiếng bíp kép.
10.2. Thông báo hiển thị
Lưu ý: *Thông báo lỗi luôn được báo bằng đèn nhận thức màu đỏ.
11. Câu hỏi thường gặp
11.1. Thay Ống Flash
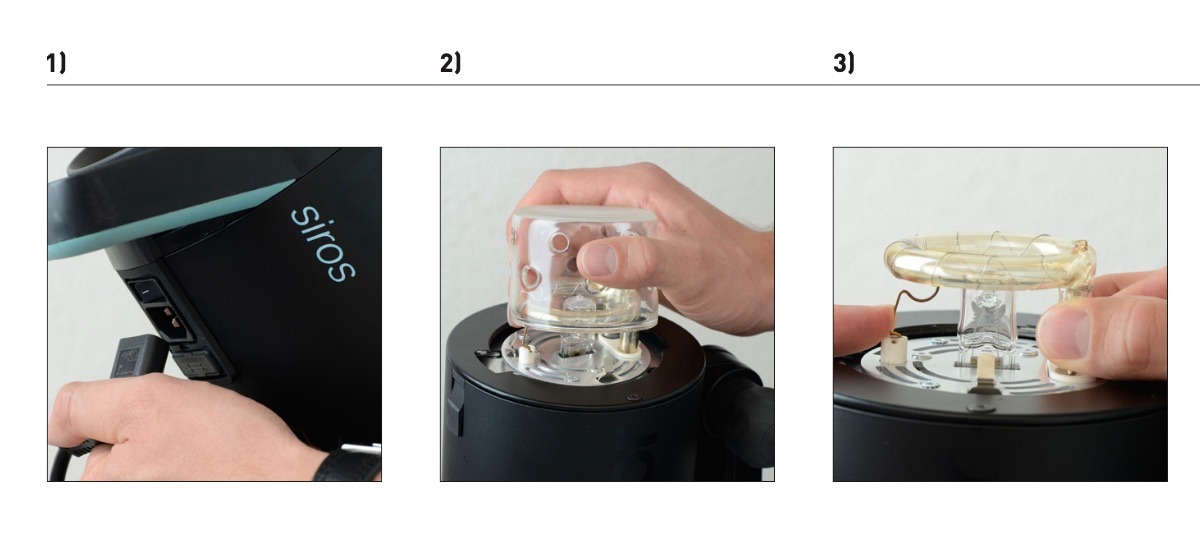
- Ngắt kết nối cáp điện khỏi thiết bị.
- Tháo kính an toàn bằng cách kéo nó ra khỏi các kẹp giữ.
- Ấn lò xo tiếp xúc xuống và cẩn thận kéo ống đèn flash ra.
11.2. Thay cầu chì
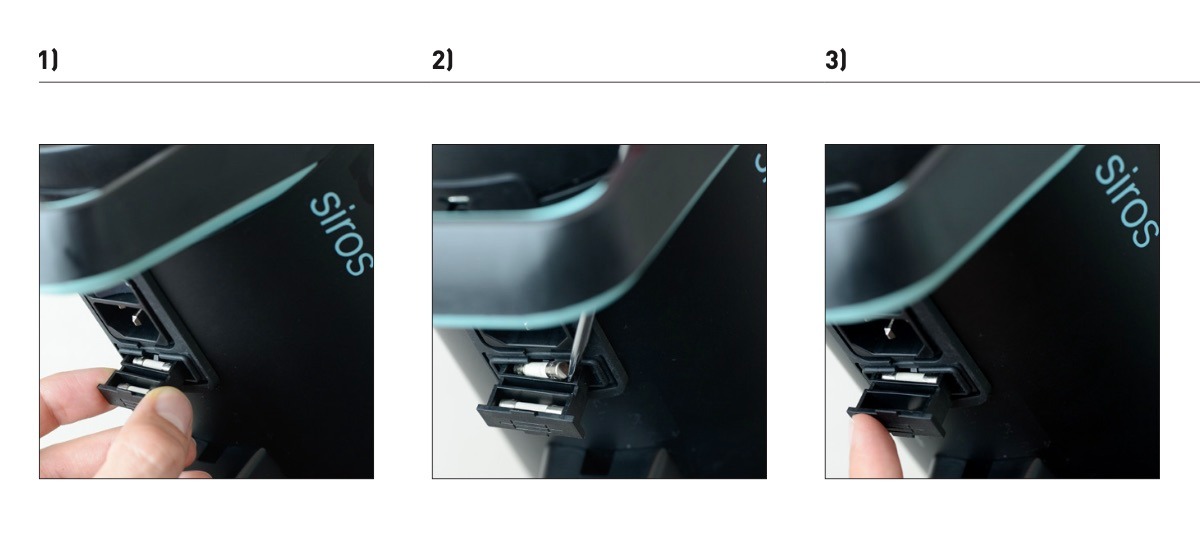
- Ngắt kết nối dây điện khỏi thiết bị (xem hình 1 phía trên). Mở ngăn cầu chì bên dưới thiết bị.
- Cẩn thận tháo cầu chì bị cháy bằng một vật nhọn.
- Lắp cầu chì thay thế và đóng lại ngăn cầu chì
11.3. Thay đổi bộ định hình ánh sáng
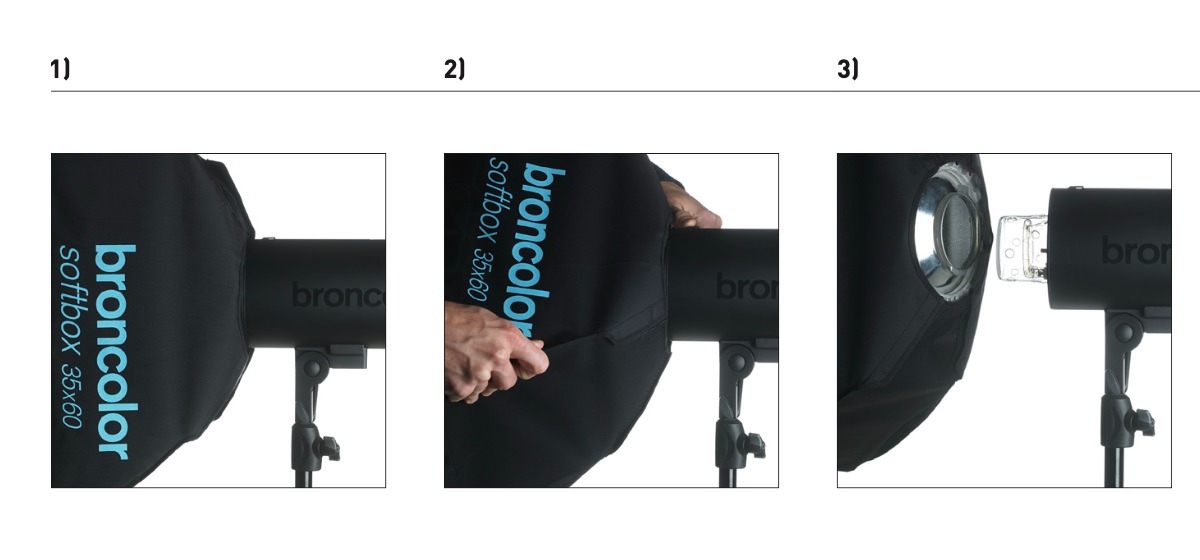
- Xoay bộ tạo ánh sáng theo bất kỳ hướng nào đến điểm dừng.
- Kéo nút nhả về phía sau và đồng thời xoay bộ định hình ánh sáng cho đến khi nó được tháo khỏi bộ phận lưỡi lê.
- Cẩn thận tháo bộ định hình đèn ra phía trước. Cẩn thận không làm hỏng kính an toàn.
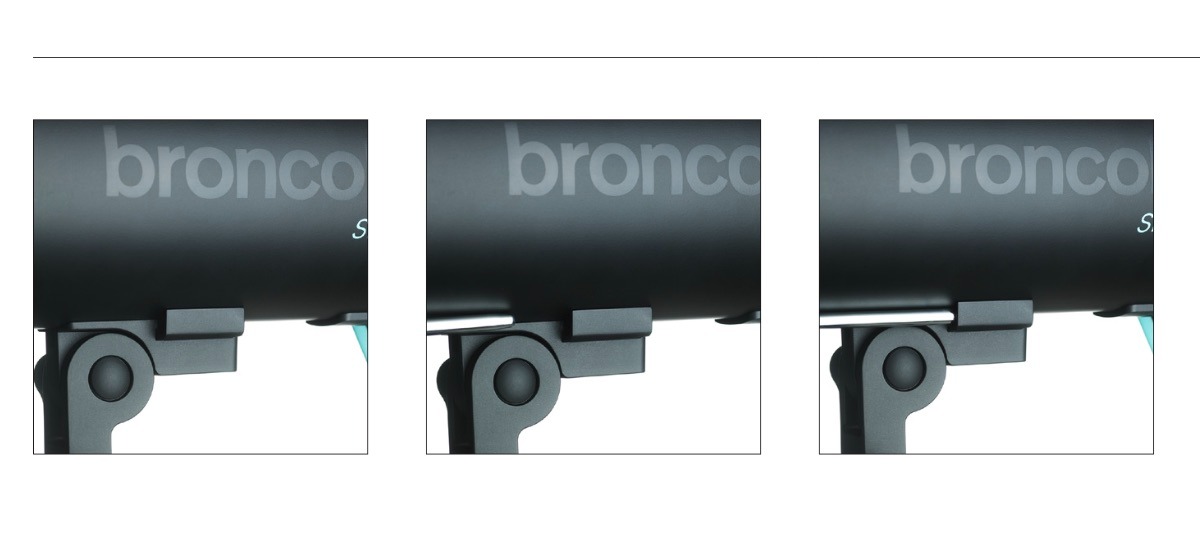
11.4. Gắn Ô
Để gắn ô, hãy gắn ô vào khe mở bên dưới thiết bị.
12. Phụ kiện
Siros tương thích với toàn bộ dòng máy tạo ánh sáng màu broncolor.
Các mặt hàng sau đây đại diện cho phụ kiện được khuyến nghị đặc biệt:
13. Bảo trì và sửa chữa
Broncolor monolight của bạn là một thiết bị chính xác, có thể mang lại hoạt động lâu năm không gặp sự cố khi được chăm sóc đúng cách. Tuy nhiên, nếu xảy ra lỗi, xin đừng cố gắng mở thiết bị và tự sửa chữa. Ngay cả khi thiết bị đã tắt, bên trong vẫn có thể có điện áp nguy hiểm. Do đó, để bảo trì và sửa chữa, luôn gửi thiết bị đến điểm dịch vụ Broncolor của bạn.
14. Thông tin Bảo vệ Môi trường
Khi hết vòng đời sử dụng, sản phẩm này không được phép xử lý như rác thải sinh hoạt thông thường. Thay vào đó, nó phải được đưa đến điểm thu gom để tái chế các thiết bị điện và điện tử. Các vật liệu có thể tái chế theo dấu hiệu của chúng. Bằng việc tái sử dụng, tái chế hoặc các hình thức sử dụng thiết bị cũ, bạn đang đóng góp quan trọng vào việc bảo vệ môi trường của chúng ta.
Vui lòng hỏi chính quyền địa phương hoặc đối tác bán hàng Broncolor về điểm xử lý phù hợp.
15. Bảo đảm
Tất cả các bộ nguồn, đèn, đèn đơn và phụ kiện broncolor đều được sản xuất theo tiêu chuẩn chất lượng cao. Broncolor cung cấp bảo hành nhà máy hai năm kể từ ngày mua (đối với chủ sở hữu đầu tiên) đối với các sản phẩm broncolor nêu trên. Loại trừ khỏi bảo hành này bao gồm bóng đèn flash, đèn halogen, kính bảo hộ, cáp, pin và vải vóc. Các lỗi do không tuân thủ hướng dẫn an toàn, xử lý sai, sử dụng phụ kiện từ nhà sản xuất khác, can thiệp trái phép hoặc sửa đổi sẽ không được bảo hành theo nhà máy. Broncolor / PhotoRobot không chịu trách nhiệm đối với thiệt hại phát sinh do không tuân thủ hướng dẫn an toàn, xử lý sai, sử dụng phụ kiện từ nhà sản xuất khác hoặc can thiệp hoặc sửa đổi trái phép. Trong trường hợp có sự cố kỹ thuật, vui lòng liên hệ ngay với trạm dịch vụ Broncolor được ủy quyền gần nhất. Mã sản phẩm, mô tả sản phẩm và phạm vi cung cấp có thể khác nhau giữa các quốc gia. Để biết thêm thông tin chi tiết, vui lòng liên hệ với đối tác bán hàng Broncolor của bạn. Lỗi và lỗi in được chấp nhận.
16. Thông báo dành cho khách hàng tại Vương quốc Anh
Thiết bị này có thể được cấu hình để kết nối với mạng LAN không dây. Vui lòng cấu hình sản phẩm này để kết nối với hạ tầng bảo mật. Không sử dụng chế độ cấu hình cho hoạt động bình thường.
- Báo cáo về lỗ hổng bảo mật: support@broncolor.swiss
- Thời gian phản ứng: 30 ngày
- Thời gian Hỗ trợ Định nghĩa của Vương quốc Anh: 2 năm kể từ ngày bán, chỉ áp dụng cho các sản phẩm bán tại Vương quốc Anh (trừ Bắc Ireland) vào hoặc sau ngày 29 tháng 4 năm 2024
- Tên nhà sản xuất: Bron Elektronik AG
- Địa chỉ nhà sản xuất: Hagmattstrasse 7, 4123 Allschwil, Thụy Sĩ
17. Dữ liệu kỹ thuật


Dòng EOS Rebel


Dòng EOS DSLR


EOS M Mirrorless Series


Dòng PowerShot


Cận cảnh / cầm tay

Dòng Canon EOS Rebel cung cấp máy ảnh DSLR thân thiện với người mới bắt đầu với chất lượng hình ảnh chắc chắn, điều khiển trực quan và các tính năng linh hoạt. Lý tưởng cho những người đam mê nhiếp ảnh, những máy ảnh này cung cấp khả năng lấy nét tự động đáng tin cậy, màn hình cảm ứng có thể thay đổi góc và quay video Full HD hoặc 4K.
Kết nối
Độ phân giải (MP)
Nghị quyết
Dòng Canon EOS DSLR mang lại hình ảnh chất lượng cao, lấy nét tự động nhanh và tính linh hoạt, lý tưởng cho cả nhiếp ảnh và sản xuất video.
Kết nối
Độ phân giải (MP)
Nghị quyết
Dòng máy ảnh không gương lật Canon EOS M kết hợp thiết kế nhỏ gọn với hiệu suất giống như máy ảnh DSLR. Với ống kính có thể hoán đổi cho nhau, lấy nét tự động nhanh và cảm biến hình ảnh chất lượng cao, những chiếc máy ảnh này rất phù hợp cho khách du lịch và người sáng tạo nội dung đang tìm kiếm tính di động mà không làm giảm chất lượng hình ảnh.
Kết nối
Độ phân giải (MP)
Nghị quyết
Dòng Canon PowerShot cung cấp máy ảnh nhỏ gọn, thân thiện với người dùng cho những người chụp ảnh bình thường và những người đam mê. Với các mô hình khác nhau, từ máy ảnh ngắm và chụp đơn giản đến máy ảnh zoom tiên tiến, chúng mang lại sự tiện lợi, chất lượng hình ảnh chắc chắn và các tính năng như ổn định hình ảnh và video 4K.
Kết nối
Độ phân giải (MP)
Nghị quyết
Máy ảnh Canon Close-Up & Handheld được thiết kế để chụp ảnh và quay video chi tiết, cận cảnh. Nhỏ gọn và dễ sử dụng, chúng cung cấp khả năng lấy nét chính xác, hình ảnh độ phân giải cao và khả năng macro linh hoạt—hoàn hảo cho vlog, chụp ảnh sản phẩm và cận cảnh sáng tạo.
Kết nối
Độ phân giải (MP)
Nghị quyết


